Flutterで小さめのアプリを作ってみた知見(アーキテクチャ・状態管理手法編)
(2022-11-30 追記) この記事は当時の理解に基いて書いたものですが、その後もう少し大きい規模のアプリケーションを作る機会があり、人と話しながらアーキテクチャ選定を進めているのですが、その観点からみると、大規模なアプケーション開発に向かない部分があったり、今みると我ながらどうしてこうしたと思う部分があるので、メモを追記しておきます。ライブラリの組み合わせ方みたいなところだけは今でも参考になると思います(逆にいうとそれ以外のところは微妙だったかもと思いなおしています。)
- hooks を多用するかどうか
アプリケーションの規模によりそうだなと思っていて、特に論点になりそうなのが状態管理系のものかなと思います。
hooks 的なものは便利だなと思いつつ、flutter では基本的に全てクラスのインスタンスとして扱かわれる以上、必要な関数だけを hooks から返すといったような使いかたはできません。
なので、例えばあるフォームから ticketId を登録して使用済みにするというような例を考えてみます。useXXForm を定義して、canSubmit を返したいようなケースを考えます。
ts だと関数をそのまま返すことができるので、以下のように書けます。
const useUseTicket = () => {
  const [ticketId, setTicketId] = useState(null);

  const canSubmit = useMemo(() => !!ticketId, [ticketId]);

  const [mutate] = useMutation(USE_TICKET);

  return {
    ticketId,
    setTicketId,
    canSubmit,
    mutate,
  };
};

const { setTicketId, canSubmit, mutate } = useUseTicket();
flutter だと class にマッピングして返すことが一般的なので、それ専用のクラスを定義する必要ができ、実質それが viewmodel に近しいものになります。
class TicketController {
  TicketController(this._ref);

  final Ref _ref;
  late final GraphQLService _service = _ref.read(graphqlServiceProvider);

  String? _ticketId;
  String? get ticketId => _ticketId;

  bool get canSubmit => _ticketId != null;

  void setTicketId(String ticketId) {
    _ticketId = _ticketId;
  }

  Future<void> mutate() {
    return _service.mutate(
      GUseTicketReq((d) => d..vars.input.ticketId = ticketId),
    );
  }
}


final fc = TicketController(ref);
fc.setTicketId(ticketId);
fc.mutate();
アプリケーションが小規模で view 側にある程度ロジックを追いても気にならないようであれば、特に問題にならないと思うのですが、ある程度の規模になったりテスタビリティとかを気にしだすと使いにくいところがありそうです。
form のような複数の状態が絡みあうようなものだと結局それらを束ねる状態クラスを定義する必要が発生しそうなので、それほど便利ではない可能性がありそうだなと感じています。
また flutter_hooks は hooks が基本的に Widget から呼びだす必要があるため、hooks をネストして、他の状態クラスの内部から使うといった使いかたはできないところも現実に使う上では困りそうなところです。
- AsyncValue を使うかどうか
AsyncValue 自体は便利なメソッドが沢山生えていますが、UI で使うにはもしかしたら不便かもしれません。 AsyncValue の when を使うと以下のように非同期状態における描画を簡単に書くことができます。
class Example extends ConsumerWidget {
  @override
  Widget build(BuildContext context, WidgetRef ref) {
    final AsyncValue<User> user = ref.watch(userProvider);

    return user.when(
      loading: () => CircularProgressIndicator(),
      error: (error, stack) => Text('Oops, something unexpected happened'),
      data: (user) => Text('Hello ${user.name}'),
    );
  }
}
ただし、欠点もあり、いずれかの状態しかとりえないため、エラーが起きたときにトーストを表示するような UI を定義した場合に data が取得できなくなり、画面が白くなるなどの問題が起きます。
また、pull to refresh をしてエラーだったら、前回の状態を保持したままエラートーストを表示するといったような使い方をする場合、前回状態とエラー状態を同時に表示する必要があるので、when メソッドなどを使うことができません。
when を使わなければいいだけですが、その場合 view model で AsyncValue が持っているようなisLoadingのような定義は内部で独自に定義してしまえばよいので、特にうれしくないかもしれません.
逆に view model ではなくリソースを操作するような controller を定義しているプロジェクトの場合は使えるかもしれないです(未検証)
- Controller の contructor で非同期通信を呼び出している件
contructor が副作用を持つのは気持ち悪いので、単に view 側でuseFuture(useMemoized(() => fetch())) を走らせた方が良いと思います。
はじめに
この記事はこの 2, 3 ヶ月ほど、お手伝いなどで Flutter のアプリ開発を行う機会があったのですが、その際に調べたり考えたりしたことをまとめたものです。 Flutter は公式ドキュメントが充実しているものの、実際に実装してみると意外と細かくハマったり、実装上で考えることがあるので、今回自分が実装したことの範囲で、そのあたりのことをまとめてみました。何かの参考になれば非常にありがたいですし、本格的な Flutter のアプリを実装するのは今回が初めてなので間違っていることや改善点があればまさかりを投げていただけると嬉しいです。
主に以下のようなことについてまとめていく予定です。
- 採用したアーキテクチャと状態管理の方法
- Navigator2.0 を用いた画面遷移の実装
- ネイティブのコードの呼び出し方
- その他開発時の tips/実装時にハマったことなど
以下は直接掘り下げることができていないので、別の機会に触れようと思います。
- 自動テスト
- ビルド・配信周り
長くなりそうなので、いくつかに分けて書いていこうと思います。今回は採用したアーキテクチャと状態管理手法についてまとめます。
アプリの概要
実際のコードがあったほうがわかりやすいと思うので、今回得た知見をもとに TODO アプリを作ってみました。
アプリのコードはこちらです。 https://github.com/nobuhikosawai/flutter_todo
以下のようなアプリでユーザーの認証と TODO の CRUD を機能として持っています。認証とデータの永続化のバックエンドには Firebase を使っています。
アーキテクチャの概要
基本的にはクリーンアーキテクチャをベースにアプリの複雑さに対してアーキテクチャが複雑になりすぎないように少し改変しています。
クリーンアーキテクチャについては以下の記事などを参考にしてください
今回の設計ではは大きくは data fetching レイヤーと presentational レイヤーの 2 つに分割しています。
data fetching レイヤー
クリーンアーキテクチャの interface adapter 相当のレイヤーです。Repository と Entity を格納しています。 Repository はインターフェースと実装を分離して実際に使うクラス DI するようにしています。
presentational レイヤー
ユーザーから実際に見える画面に関する責務を持つレイヤーです。View や Controller が該当します。
Flutter での状態管理のライブラリの選定についてはこちらの記事を参考にしています。
ライブラリ的には
を利用しています。
上記のライブラリの使い方は色々なパターンがあると思うのですが、自分が React の経験があることもあり、割と hooks を多用し、あまり ViewModel 的なレイヤーを配置せず useProvider と useState を細かく使うようにしています。このあたりは、React Hooks のドキュメントなども参考にしています。
(当然ですが React と Flutter は異なるものなので、これが最適なのかやパフォーマンス的な問題を引き起こさないかについては、まだ自分の理解が足りていないところがあります。)
今回のアプリでどのように使っているかは後ほど説明します。
ディレクトリ構成
lib 以下のディレクトリ構成を示します。
   lib
   ├── data # クリーンアーキテクチャのdata featchingレイヤー (interface adapter)
   │   ├── datastores # repositoryの実装
   │   ├── entities # ドメインモデル
   │   ├── providers # DIコンテナ
   │   └── repositories # repositoryのinterface
   └── ui # クリーンアーキテクチャのpresentationalレイヤー
       ├── controllers
       └── screens # 画面
           ├── sign_in_screen # ログインページ
           ├── splash_screen # スプラッシュ画面
           └── todo_screen # メイン画面
それぞれの概要は以下の通りです。
data ディレクトリ
repositories
API 呼び出しなどアプリの外部にあるリソースへのアクセス方法のインターフェース定義です。 あくまでインターフェース定義だけで実装はここにはありません。
これは特にモバイルアプリだと firestore などのリモートからのデータ取得とローカルキャッシュからのデータ取得が発生したりすることがあるためで、実装とインターフェースを区別にしています。
慣習的に命名規則として Repository という suffix をつけることが多いようなので、これを踏襲しています。
datastores
repositories で定義されたインタフェースに沿う実際の実装が書かれています。
先述の通り 1 つのインターフェースに紐付いてローカルとリモートのように複数の datastore の実装が存在することもありえます。(firebase を使っているとライブラリ側でローカルとリモートの扱いを吸収してくれるので、今回例として作成した todo アプリではそこまで複雑な実装はしていないです。)
命名規則として RepositoryImpl という suffix をつけています。
providers
他のクラスがレポジトリを使用する際に具体的にどのクラスを使用するかの依存関係を注入してます。Riverpod の Provider を使って DI しています。
entities
サービスとして行うべきビジネスルールをカプセル化したものです。 アプリで実装されているかどうかに関わらず、サービスとして提供する一連の操作を実装したものになります。 最も中核のレイヤーとなるので、他のレイヤーとの依存を持ちません。
レポジトリが返すリソースはここで定義されているドメインモデルをそのまま返すことを想定しています。 アプリの状態管理をイミュータブルにするために Freezed を使っています。
ui ディレクトリ
controllers
ユースケース相当のレイヤーです。画面から呼び出す状態の定義と変更のためのロジックを記述します。実装には StateNotifier を使っています。
命名規則として Controller という suffix をつけています。
screens
ユーザーに描画される画面(Widget)が格納されています。
1 つの画面内部で複数の Widget を持つことがあるため、ルーティングをもつ画面ごとにディレクトリを切り、その中に複数の Widget を格納するようにしています。
命名規則としては、ディレクトリが ${page_name}_screen になっており、特にルーティングに紐づくような画面は同名で保存しています(${page_name}_screen/${page_name}_screen.dart の形式で格納されています。 例えばlib/ui/screen/todo_screen/todo_screen.dartのような形式です)それ以外の Widget については特に命名のルールは定めていません。
common
アプリ内で共通で使う汎用的な UI コンポーネントがあれば別途専用のディレクトリを定義してもよい良いと考えています。
todo アプリの例ではそこまで必要なかったので作成はしていません。
依存の順序
上記をもとに実装の依存の順番まとめたものが以下です。
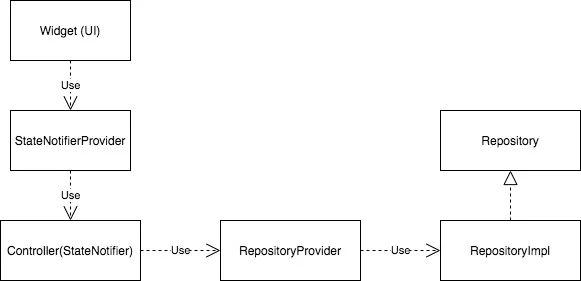
UI Widet は StateNotifierProvider を経由して、Controller(StateNotifier)に依存し、StateNotifier は RepositoryProvider 経由で Repository に依存します。
実装例
ここからは上記の設計方針に基づいて、Todo アプリの例で実際にどのように実装しているかを見ていきたいと思います。
メインの画面である Todo の画面を例に今回作成したアプリがどのように実装しているかについて説明します。
Data fetching レイヤー
データ取得側のレイヤーについてまとめます。先述の通り、レポジトリパターンを採用しています。
この例では Todo を取得します。
Todo 取得のために必要なレポジトリは TodoRepository で定義されています。
import '../entities/todo.dart';
import '../entities/todos.dart';

abstract class TodoRepository {
  Stream<Todos> listTodos({required String meId});

  Future<Todo> createTodo(
      {required String meId,
      required String title,
      required double position});

  Future<void> updateTodo(
      {required String id, String? title, bool? completed, double? position});

  Future<void> deleteTodo({required String id});
}
レポジトリの実装は別途 TodoRepositoryImplとして定義されています。
import 'package:cloud_firestore/cloud_firestore.dart';
import 'package:flutter/foundation.dart';

import '../entities/todo.dart';
import '../entities/todos.dart';
import '../repositories/todo_repository.dart';

class TodoRepositoryImpl extends TodoRepository {
  TodoRepositoryImpl() {
    _firestore = FirebaseFirestore.instance;
  }

  late FirebaseFirestore _firestore;

  @override
  Stream<Todos> listTodos({required String meId}) {
    return _firestore
        .collection('todos')
        .where('auth_id', isEqualTo: meId)
        .orderBy('position', descending: true)
        .snapshots()
        .asyncExpand<Todos>((event) async* {
      final todoList = event.docs.map((d) {
        return Todo(
          id: d.id,
          title: d['title'] as String,
          completed: d['completed'] as bool,
          position: (d['position'] as num).toDouble(),
          // This is a workaround because updatedAt is changed by updateTodo method with
          // ServerTimestamp, updateAt can be null during update.
          // There is a way to use serverTimestampBehavior of SnapshotOptions for
          // other platform such as iOS and android so this should be fix to flutter
          // any time soon. Meanwhile the workaround is used.
          createdAt: d['created_at'] == null
              ? DateTime.now()
              : (d['created_at'] as Timestamp).toDate(),
          updatedAt: d['updated_at'] == null
              ? DateTime.now()
              : (d['updated_at'] as Timestamp).toDate(),
        );
      }).toList();

      final uncompletedItems =
          todoList.where((item) => !item.completed).toList();
      final completedItems = todoList.where((item) => item.completed).toList();

      completedItems.sort((a, b) => b.updatedAt.compareTo(a.updatedAt));

      yield Todos(
          uncompletedItems: uncompletedItems, completedItems: completedItems);
    });
  }

  @override
  Future<Todo> createTodo(
      {required String meId,
      required String title,
      required double position}) async {
    ...
  }

  @override
  Future<void> updateTodo(
      {required String id,
      String? title,
      bool? completed,
      double? position}) async {
    ...
  }

  @override
  Future<void> deleteTodo({required String id}) async {
    await _firestore.collection('todos').doc(id).delete();
  }
}
レポジトリは取得したリソースとして entity のインスタンスを返します。entity は別で TodoとTodosとして定義されています。単一の Todo モデルと配列を扱うファーストクラスコレクションとしての Todos モデルの 2 つを定義しています。immutable になるように Freezed を用いています。entity は以下のように定義されています。
import 'package:freezed_annotation/freezed_annotation.dart';
import 'package:flutter/foundation.dart';

part 'todo.freezed.dart';

@freezed
abstract class Todo with _$Todo {
  factory Todo({
    required String id,
    required String title,
    required bool completed,
    required double position,
    required DateTime createdAt,
    required DateTime updatedAt,
  }) = _Todo;
}
Todos の方はインターフェースの定義に加えて、コレクションの操作などアプリのビジネスルールとなる todo の操作に関するロジックが含まれています。
import 'package:freezed_annotation/freezed_annotation.dart';
import 'package:flutter/foundation.dart';

import 'todo.dart';

part 'todos.freezed.dart';

@freezed
abstract class Todos implements _$Todos {
  const Todos._();

  const factory Todos({
    required List<Todo> uncompletedItems,
    required List<Todo> completedItems,
  }) = _Todos;

  Todos reorder(String id, int newIndex) {
    final newPosition = _reorderedPositionAtNewIndex(newIndex);
    final newItems = uncompletedItems.map((item) {
      if (item.id == id) {
        return item.copyWith(position: newPosition);
      } else {
        return item;
      }
    }).toList();
    newItems.sort((a, b) => b.position.compareTo(a.position));

    return copyWith(uncompletedItems: newItems);
  }

  Todos complete(String id) {
    final targetItem = uncompletedItems.firstWhere((item) => item.id == id);
    final newUncompletedItems =
        uncompletedItems.where((item) => item.id != id).toList();
    final newCompletedItems = [
      targetItem.copyWith(completed: true, position: 0),
      ...completedItems,
    ];
    return copyWith(
        uncompletedItems: newUncompletedItems,
        completedItems: newCompletedItems);
  }

  Todos uncomplete(String id) {
    final targetItem = completedItems.firstWhere((item) => item.id == id);
    final newCompletedItems =
        completedItems.where((item) => item.id != id).toList();
    final newUncompletedItems = [
      targetItem.copyWith(completed: false, position: newPosition()),
      ...uncompletedItems,
    ];
    return copyWith(
        uncompletedItems: newUncompletedItems,
        completedItems: newCompletedItems);
  }

  Todos update({required String id, required String title}) {
    final newItems = uncompletedItems.map((item) {
      if (item.id == id) {
        return item.copyWith(title: title);
      } else {
        return item;
      }
    }).toList();

    return copyWith(uncompletedItems: newItems);
  }

  Todos delete(String id) {
    final newUncompletedItems =
        uncompletedItems.where((item) => item.id != id).toList();
    final newCompletedItems =
        completedItems.where((item) => item.id != id).toList();
    return copyWith(
        uncompletedItems: newUncompletedItems,
        completedItems: newCompletedItems);
  }

  double newPosition() {
     ...
  }

  double _reorderedPositionAtNewIndex(int newIndex) {
     ...
  }
}
定義した Repository の受け渡しには Provider を使って DI をしています。Provider の実装はtodoRepositoryProviderとして定義されており、以下のような実装になっています。
import 'package:riverpod/riverpod.dart';

import '../datastores/todo_repository_impl.dart';

final todoRepositoryProvider = Provider((ref) => TodoRepositoryImpl());
Presentation レイヤー
マップのメインの画面はTodoScreenとして定義されています。
マップから参照する Todo の状態はアプリケーションの状態として、StateNotifier で管理しています。Widget との状態の受け渡しには Riverod の StateNotifierProvider 経由で渡し、Widget 側は Flutter Hooks の useProvider を利用して取り出しています。
具体的に見たほうがわかりやすいので、順番に見ていきたいと思います。
まずメインの TodoScreen です。Flutter Hooks を使用するために HookWidget を継承しています。
useProvider が Widget で状態を取得している箇所です。
class TodoScreen extends HookWidget {
  @override
  Widget build(BuildContext context) {
    final me = useProvider(meProvider);
    final meId = me.data?.value?.id;

    if (meId == null) {
      return Container();
    }

    final todos = useProvider(todoProvider(meId));
    final todoController = useProvider(todoProvider(meId).notifier);

    ...
  }
}
画面には StateNotifier 定義された todo の state が todoProvider というので渡ってきています。
todoProvider の定義は以下のとおりです。
final todoProvider = StateNotifierProvider.family<TodoController, AsyncValue<Todos>, String>(
    (ref, meId) => TodoController(ref, meId: meId));
StateNotifierProvider は StateNotifier で管理されている状態の変更を Widget に通知するための仕組みです。 StateNotifierProider については公式のドキュメントの他にこちらの記事もわかりやすいです。
state を返す Controller(StateNotifier)側の実装は以下のようなイメージです。 状態の取得と更新に関するメソッドが定義されています。 それぞれのメソッドの中では entity のメソッドを呼び出し、状態の更新を行ったり、バックエンドサーバーとの通信を行っています。
import 'package:riverpod/riverpod.dart';
import 'package:state_notifier/state_notifier.dart';

import '../../data/entities/todos.dart';
import '../../data/providers/todo_repository_provider.dart';
import '../../data/repositories/todo_repository.dart';

class TodoController extends StateNotifier<AsyncValue<Todos>> {
  TodoController(this._reference, {required this.meId})
      : super(AsyncValue.loading()) {
    _listTodos();
  }

  late TodoRepository _repository;

  final String meId;

  final ProviderReference _reference;

  void _listTodos() {
    _repository = _reference.read(todoRepositoryProvider);
    _repository.listTodos(meId: meId).listen((todos) {
      state = AsyncValue.data(todos);
    });
  }

  Future<void> createTodo(String title) async {
    _repository = _reference.read(todoRepositoryProvider);
    final position = state.data!.value.newPosition();
    await _repository.createTodo(meId: meId, title: title, position: position);
  }

  Future<void> updateOrder(String id, int newIndex) async {
    _repository = _reference.read(todoRepositoryProvider);
    final newState = state.data!.value.reorder(id, newIndex);
    state = AsyncValue.data(newState);
    final position =
        newState.uncompletedItems.firstWhere((item) => item.id == id).position;
    await _repository.updateTodo(id: id, position: position);
  }

  Future<void> completeTodo(String id) async {
    _repository = _reference.read(todoRepositoryProvider);
    final newState = state.data!.value.complete(id);
    state = AsyncValue.data(newState);
    final completedTodo =
        newState.completedItems.firstWhere((item) => item.id == id);
    await _repository.updateTodo(
        id: id,
        completed: completedTodo.completed,
        position: completedTodo.position);
  }

  Future<void> uncompleteTodo(String id) async {
    _repository = _reference.read(todoRepositoryProvider);
    final newState = state.data!.value.uncomplete(id);
    state = AsyncValue.data(newState);
    final uncompletedTodo =
        newState.uncompletedItems.firstWhere((item) => item.id == id);
    await _repository.updateTodo(
        id: id,
        completed: uncompletedTodo.completed,
        position: uncompletedTodo.position);
  }

  Future<void> update({required String id, required String title}) async {
    _repository = _reference.read(todoRepositoryProvider);
    final newState = state.data!.value.update(id: id, title: title);
    state = AsyncValue.data(newState);
    final newTitle =
        newState.uncompletedItems.firstWhere((item) => item.id == id).title;
    await _repository.updateTodo(id: id, title: newTitle);
  }

  Future<void> delete(String id) async {
    _repository = _reference.read(todoRepositoryProvider);
    final newState = state.data!.value.delete(id);
    state = AsyncValue.data(newState);
    await _repository.deleteTodo(id: id);
  }
}
StateNotifier は TodoRespository に依存しています。TodoRepository の instance の取得には、todoRepositoryProvider から ProviderReference という他の Provider の内容を読む仕組みを経由して取得しています(ProviderReference の使用についてはドキュメントやこのあたりの issueが参考になります) 。
StateNotifier からの値の取り出しはすべて、state プロパティ経由で取り出します。そのため state の状態を変更するメソッドはすべて void で、直接戻り値を使用することはありません。Riverpod の 0.14.0 からは、明示的に state プロパティを指定しなくても、useProvider 経由で取得するだけで state が取得されます。(issue)
非同期に取得するデータの StateNotifier の型は、Riverpod が提供しているAsyncValueで定義しています(参考にした issue コメント)。
これによりwhen メソッドを使うことで非同期な状態がとる loading 中、エラー時、data 取得後のそれぞれの状態を直感的に定義できるようになる点です。以下のような感じで使えます。
return todos.when(
  loading: () => Container(),
  error: (error, stack) => Container(),
  data: (todos) {
    return Scaffold(
      body: ....
    );
);
また状態取得のための最初の API 呼び出しは Controller のコストラクタ内部で行っています。これにより、呼び出し側が明示的に API を call するようなメソッドを呼び出す必要がなく、知るべきことが少なくなるメリットがあります。
例えばコンストラクタ内部で API 呼び出しをせずに以下のような StateNotifier を定義した場合、以下のように呼び出し側で明示的に状態の取得を呼び出す必要があり、やや不自然な実装になります。(useMemoized を使う理由はこの issue(1、2)で説明されています)
class TodoController extends StateNotifier<Accident> {
  AccidentController(ProviderReference ref, {@required this.meId})
      : _ref = ref,
        super(null);

  late TodoRepository _repository;

  final String meId;

  final ProviderReference _ref;

  Stream<void> fetch() async* {
    _repository = _ref.read(todoRepositoryProvider);
    yield _repository.getAccidents(meId: meId)?.listen((todos) {
      state = todos;
    });
  }
final todoController = useProvider(todoProvider(meId).notifier);
final todoStream = useMemoized(() => todoController.fetch(), []);
useStream(todoStream);
final todos = useProvider(todoProvider(meId));
...コンストラクタ内部で API 呼び出しをすると useProvider で呼び出すだけでよくなるので、よりシンプルな実装になります。
// TodoControllerのコンスタラクタの中でサーバーからの取得が行われる
final accidentResult = useProvider(accidentProvider(meId));
Todo の作成など状態の更新時は controller のメソッドを呼び出します。 以下のようなコードイメージです。
class TodoScreen extends HookWidget {
  @override
  Widget build(BuildContext context) {
    ...
    // controllerを取得
    final todoController = useProvider(todoProvider(meId).notifier);

    return todos.when(
      data: (todos) {
         return Scaffold(
          ...
          floatingActionButton: FloatingActionButton(
            backgroundColor: Theme.of(context).primaryColor,
            onPressed: () {
              showModalBottomSheet<void>(
                  context: context,
                  builder: (buildContext) {
                    return SingleChildScrollView(
                        child: Container(
                            child: Wrap(
                      children: [
                        TodoInputForm(
                           // controllerのメソッド呼び出し
                            onSaved: (str) =>
                                todoController.createTodo(str)),
                      ],
                    )));
                  });
            },
            child: Icon(Icons.add),
          ),
         )
        ...
      }
    );
  }
}
画面全体の実装イメージは以下のような感じになります。
import 'package:flutter/material.dart';
import 'package:flutter_hooks/flutter_hooks.dart';
import 'package:hooks_riverpod/hooks_riverpod.dart';

import '../../controllers/me_controller.dart';
import '../../controllers/todo_controller.dart';
import 'completed_todo_item.dart';
import 'todo_input_form.dart';
import 'todo_item.dart';

class TodoScreen extends HookWidget {
  @override
  Widget build(BuildContext context) {
    final me = useProvider(meProvider);
    final meId = me.data?.value?.id;

    if (meId == null) {
      return Container();
    }

    final todos = useProvider(todoProvider(meId));
    final todoController = useProvider(todoProvider(meId).notifier);

    final displayCompleted = useState<bool>(false);

    return todos.when(
        data: (todos) {
          final uncompletedTodos = todos.uncompletedItems;
          final completedTodos = todos.completedItems;

          return GestureDetector(
              onTap: () => FocusScope.of(context).unfocus(),
              child: Scaffold(
                body: SafeArea(
                    child: Container(
                        padding: EdgeInsets.symmetric(horizontal: 16.0),
                        child: CustomScrollView(
                          slivers: [
                            SliverList(
                               ...
                            ),
                            ...
                          ],
                        ))),
                floatingActionButton: FloatingActionButton(
                  backgroundColor: Theme.of(context).primaryColor,
                  onPressed: () {
                    // ref: https://github.com/flutter/flutter/issues/18564#issuecomment-519429440
                    showModalBottomSheet<void>(
                        shape: RoundedRectangleBorder(
                          borderRadius: BorderRadius.only(
                              topLeft: Radius.circular(16.0),
                              topRight: Radius.circular(16.0)),
                        ),
                        context: context,
                        builder: (buildContext) {
                          return SingleChildScrollView(
                              child: Container(
                                  child: Wrap(
                            children: [
                              TodoInputForm(
                                  onSaved: (str) =>
                                      todoController.createTodo(str)),
                            ],
                          )));
                        });
                  },
                  child: Icon(Icons.add),
                ),
              ));
        },
        loading: () => Center(child: CircularProgressIndicator()),
        error: (error, stackTrace) {
          return Container(); // TODO: implement error page
        });
  }
}
その他
App State 以外の箇所でも Flutter Hooks を使っていて、画面で一時的に必要な状態は、Flutter Hooks の useState を使っています。
上記で解説したような状態管理手法のキャッチアップには、各ライブラリの公式ドキュメントや example を見るのが一番参考になりました。
Hooks についてはライブラリの作者が React を参考にしているため、React Hooks のドキュメントを参考にするのがよいです。
書いてから気づいたのですが、Riverpod を使った Todo アプリのサンプルコードの例は割とちょこちょこネットでもあって、割とオーソドックスになりつつあるのかもしれません。 サンプルコードだと API 呼び出しをしている例があまり多くなかったり、ライブラリの組み合わせが少し違ったりもするので、そのあたりでなにか参考になればと思います。
また、これ以外にもアプリの設計は色んなパターンがありえてこれ以外の例だと
などがあります。
絶対の正解はなくスタイルやアプリの規模によって適切な設計は変わってくると思うので、必要に応じてぜひこれらの例も参考にしてみてください。
次回は Navigator2.0 を用いた画面遷移の実装についてまとめます。